Low Back Rehabilitation
LOW BACK REHABILITATION & CORE STABILITY
Please only follow this program on the advice of your osteopath and stop any prescribed exercises at the onset of any abnormal pain or discomfort.
This program has been developed to assist with the rehabilitation of your low back pain. It does not replace the benefits of supervised rehabilitation but rather provides an economical and flexible program that you can perform at home.
Why implement this program?
After the onset of acute low back injuries surrounding tissues can begin to lose their normal function and become weak (weakness and poor function may have also contributed to the injury). Weakness and poor function can delay recovery and cause further complications. An important aspect of recovery from injury is to safely restore these tissues towards their designed function. This program will assist you with this.
The key elements to keeping your spine healthy are:
1. Learning and practicing good posture (your osteopath and the rehab program will assist with this).
2. Using good body mechanics during everyday activities (outlined below).
3. Regular cardiovascular and strengthening exercises
Using good body mechanics during everyday activities: Important things to remember:
How tasks are performed each day can have an impact on your recovery. Don’t place unnecessary stress on the muscles and joints of your back. Here are some tips to reduce the stress on your lower back:
- Change your posture frequently throughout the day (e.g. do not sit in the one position for greater than 20 minutes).
- Assume the upright stress free posture for short periods regularly throughout the day (your osteopath will show you this).
- Carry lighter weights or always request assistance with lifting.
- Rotate work chores. Joints and muscles like activity but not to excess.
- Change from one task to another consistently (Don’t wait for too much fatigue and pain to settle in before changing tasks)
- Gradually increase your activity and increase tolerance. Click on the links for further information on the Benefits of Good Posture and information on Home/Work Ergonomics
General Information
- It is recommended that these exercises are performed at least 3-5 times per week.
- It is preferable that you have a rest day in between some exercising days to allow muscle recovery
- Please cease exercises with the onset of any abnormal discomfort or sharp pain.
- The warm up and cool down need to be long and slow to allow appropriate range of motion and proprioceptive (neural awareness) of the muscles and joints. This will decreases the likelihood of further damage.
Stretching for your Low Back Pain
Performing your stretches throughout the day and especially prior to commencing your core stability exercises will reduce the risk of strain and injury and enhance recovery and will also allow optimum conditioning/adaptation of the muscles you are working.
Aerobic Exercise for Low Back Pain
Benefits of aerobic exercise for your low back pain/injury:
· Less chance of re-injuring: Will reduce the risk of the injury reoccurring
· Less pain: More likely to have less pain when if you re-injure your back
· Improved function: More likely to be able to perform daily activities (e.g. working, home, recreational life). Patients with chronic low back pain who don’t engage regular exercise are more likely to experience the gradual loss of functional capabilities.
· Weight loss/control: will reduce stress placed on the spine structures and joints.
· Increased endorphins: 30-40 minutes exercise can increase endorphin levels which can reduce pain. Endorphins are a natural painkiller. This may also reduce your pharmaceutical use.
Walking
Walking should be approximately 30-40 minutes for a minimum 2-4 times per week. Appropriate posture is important to ensure maximum benefit so discuss this with your osteopath.
In the Pool
Swimming has been recommended because doing exercise in the water provides for effective conditioning while minimizing stress on the back because the buoyancy of water counteracts the gravitational pull that can compress the spine. It is recommended that you do the following at for at least half an hour 2-4 times per week:
· Freestyle
· Backstroke
· Walking in the pool
Note: Feel free to mix up how long you spend doing each as variety will work different muscles. As with any exercise please stop at the commencement of any pain in your low back.
Core Muscle Strengthening Program Progression
Progression: advance through each section as you become proficient with each step
STAGE 1: Static Low Impact Activation and Strengthening
STAGE 2: Static Low Impact Functional Activation and Strengthening
STAGE 3: Simple Static Moderate Impact Activation and Strengthening
STAGE 4: Advanced Strengthening
STAGE 1: Static Low Impact Activation and Strengthening
EXERCISE 1: Activating the Transversus Abdominis (TA) & Pelvic Floor
Activating the Transversus Abdominis (TA)
The first and most important/difficult step is learning how to find this muscle and activate it (it is preferable that you go through this with your osteopath or someone proficient with this exercise). There are many layers of muscle/tissue that overly this muscle and it is too deep to be obvious. Identifying the correct one to activate requires succinct attention to what you are feeling.
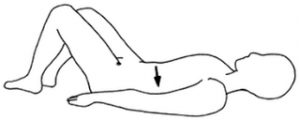
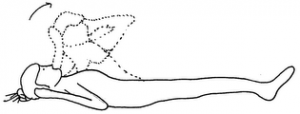
1. Lie in the relaxation position on your back with your knees up [see picture].
2. Note: Whilst learning to feel for the Transverse Abdominus Muscle it is best to feel for it with your fingers. Place your fingers about half way between your belly button and hip bone and gently press down so you can feel your belly rise as you take a deep breath in. The TA muscle is a thin layer of muscle below your big ab muscles.
3. Contract your TA by drawing your lower abdominal wall inward towards the spine (imagine your belly button going towards your back).
4. Note: Contacting this muscle should be only at 20-30% of what you would consider a normal contraction (e.g. of your biceps muscle). Care must be taken to avoid contracting the larger overlying abdominal muscles; therefore normal breathing must continue throughout the exercise. Remember to keep your buttock muscles (Gluteal Muscles) relaxed.
5. Initially hold this contraction for 3-5 seconds and progressively increase to 10 seconds when ready. Commence with 10 repetitions 3 times per day and progress to 20 repetitions.
6. Once you feel comfortable with this exercise combine with the pelvic floor and perform both exercises together (i.e. contract your TA and then your Pelvic Floor and hold).
Activating the Pelvic Floor
The first and most important/difficult step is learning how to find this muscle and activate it (it is preferable that you go through this with your osteopath or someone proficient with this exercise). There are many layers of muscle/tissue that overly this muscle and it is too deep to be obvious. Identifying the correct one to activate requires succinct attention to what you are feeling.
- Lie in the relaxation position on your back with your knees up [see picture].
- Note: Whilst learning to feel for the Pelvic Floor you can place your fingers deep into the abdomen about half way between your belly button and hip bone. Feel for the rising pelvic floor from your pelvis.
- Imagine your pelvis like a clock face and that you are drawing all the numbers slightly inwards whilst lifting the center towards your belly.
- Note: Contacting this muscle should be only at 20-30%of what you would consider a normal contraction (e.g. of your biceps muscle). Care must be taken to avoid contracting the larger overlying abdominal muscles; therefore normal breathing must continue throughout the exercise. Remember to keep your buttock muscles (Gluteal Muscles) relaxed.
- Initially hold this contraction for 3 seconds and progressively increase to 10 seconds when ready. Commence with 10 repetitions 3 times per day and progress to 20 repetitions.
- Once you feel comfortable with this exercise combine with the TA Exercise and perform both exercises together (i.e. contract your TA and then your Pelvic Floor and hold).

EXERCISE 2: The Clam (Gluteal/Buttock Strengthening)
1. Lie on your side with your knees bent (ankles together).
2. Place your top hand on your buttock (gluteal) area (as shown).
3. Activate your TA and Pelvic Floor and hold.
4. Slowly bring your top leg up (knees coming away from each other) and feel for activation of your gluteal muscles with your hand.
5. Hold a contraction for 3-5 seconds and then slowly lower your knee down.
6. Commence with 10 repetitions (each side) 3 times per day and progress to 20 repetitions.

EXERCISE 3: Low Back Strengthening (Superman Progression)
1. Lie on your front (you may have a towel under your forehead for extra support).
2. Tighten your abdominal (TA & Pelvic Floor) and then buttock muscles (Gluteal Muscles).
3. Gently lift your head and arm straight in front of you (You should feel the muscles in your low back contract which should also create a slight arch in your low back).
4. Hold for 3 seconds then return it back to the floor. Repeat with opposite side.
5. Progress through each exercise 1 through 8 as outlined below 3 times.
6. Perform a set of 3 progressions Three times per day

1. One Arm 2. One Leg 3. One Arm and Opposite Leg 4. One Arm and One Leg on Same Side
5. Two Arms 6. Two Legs 7. One Arm and Two Legs 8. Two Arm and Two Legs
STAGE 2: Static Low Impact Functional Activation and Strengthening
EXERCISE 1: Functional Core activation – Table Top Exercise
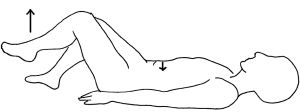
1. Lie in the relaxation position on your back with your knees up [see picture].
2. Tighten your abdominal (TA & Pelvic Floor) and then buttock muscles (Gluteal Muscles).
3. Gently lift 1 leg off the floor out and hold in line with your knee (like you are placing it on an imaginary coffee table).
4. Hold for 3 seconds then return it back to the floor. Repeat with opposite leg.
5. Commence with 10 repetitions (each side) 3 times per day and progress to 20 repetitions.
EXERCISE 2: All Fours Progression
All Fours Arm Lift
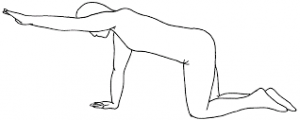
- Whilst positioned on all fours gently tighten your abdominal (TA & Pelvic Floor) and then buttock muscles (Gluteal Muscles)
- Lift 1 arm off the floor out in front of your head, hold for 3 seconds then return it back to the floor.
- Repeat with opposite arm.
- Commence with 10 repetitions (each side) 3 times per day and progress to 20 repetitions.
All Fours Leg Lift
- Whilst positioned on all fours gently tighten your abdominal (TA & Pelvic Floor) and then buttock muscles (Gluteal Muscles)
- Lift 1 leg off the floor straight out behind you in a straight line with your body, hold for 3 seconds then return it back to the floor.
- Repeat with opposite leg.
- Commence with 10 repetitions (each side) 3 times per day and progress to 20 repetitions.

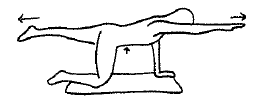
All Fours Leg and Arm Lift
- Whilst positioned on all fours gently tighten your abdominal (TA & Pelvic Floor) and then buttock muscles (Gluteal Muscles)
- Lift one leg and the opposite arm off the floor in a straight line with your body, hold for 3 seconds then return it back to the floor.
- Repeat with opposite arm and leg.
- Commence with 10 repetitions (each side) 3 times per day and progress to 20 repetitions.
STAGE 3: Moderate Activation and Strengthening
EXERCISE 1: The Bridge
1. Lie on your back with your hands by your side, your knees bent and feet flat on the floor (feet under knees).
2. Tighten your abdominal (TA & Pelvic Floor) and then buttock muscles (Gluteal Muscles).
3. Lift your hips up and create a straight line from your knees to shoulders (Do not arch your back too much).
4. You may lose some core activation during the lift so activate your core again (try to pull your belly button back toward your spine).
5. Remember to breathe through the exercise.
6. Hold for 3 seconds and then slowly lower yourself down.
7. Commence with 10 repetitions 3 times per day.
8. Aim to increase holding the position for up to 10-15 seconds.

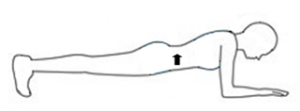
EXERCISE 2: The Plank
1. Lie on your front with your hands by your head and toes pointed towards the ground
2. Tighten your abdominal (TA & Pelvic Floor) and then buttock muscles (Gluteal Muscles).
3. Lift your body off the floor (as shown) resting on your toes and elbows.
4. You may lose some core activation during the lift so activate your core again (try to pull your belly button back toward your spine).
5. Remember to breathe through the exercise.
6. Aim to start for holding for 5 seconds and build up to 20-30 seconds.
7. Commence with 10 repetitions 3 times per day and progress to 20 repetitions.
Variations:
As you become proficient with the plank you can make the exercise more dynamic by:
· Lifting 1 arm out in line with your body
· Lifting 1 leg out in line with your body
· Lifting 1 arm and the opposite leg out in line with your body
EXERCISE 3: The Side Plank
1. Lie on your side with your elbow on the floor under your shoulder.
2. Tighten your abdominal (TA & Pelvic Floor) and then buttock muscles (Gluteal Muscles).
3. Lift your body off the floor (as shown) using your elbow to stablise.
4. You may lose some core activation during the lift so activate your core again (try to pull your belly button back toward your spine).
5. Remember to breathe through the exercise.
6. Then slowly drop your body back to the start position.
7. Aim to start for holding for 5 seconds and build up to 20-30 seconds.
8. Commence with 10 repetitions on each side of the body 3 times per day and progress to 20 repetitions.

EXERCISE 4: The Squat
1. Stand with your feet shoulder-width apart.
2. Tighten your abdominal (TA & Pelvic Floor) and then buttock muscles (Gluteal Muscles).
3. Slowly lower your body as far as you can by pushing your hips back and bending your knees until your thighs are parallel to the floor.
4. You may lose some core activation during the squat so activate your core again (try to pull your belly button back toward your spine).
5. Remember to breathe through the exercise.
6. Pause for about 5 seconds and slowly stand back up to the start position.
7. Aim to start for holding for 5 seconds and build up to 20-30 seconds.
8. Commence with 10 repetitions 2 times per day and progress to 20 repetitions.

EXERCISE 5: The Lunge
1. Stand with right foot forward, left foot back about 3 feet apart.
2. Tighten your abdominal (TA & Pelvic Floor) and then buttock muscles (Gluteal Muscles).
3. Push through the front heel keeping your back upright and arms up in the air (there are variations e.g. hands by your side and you can even add weights into this exercise).
4. Remember to breathe through the exercise.
5. Pause for 3 seconds and slowly stand back up to the start position.
6. Commence with 10 repetitions 3 times per day and progress to 20 repetitions.

STAGE 4: Advanced Strengthening
These exercises increase the sheer and torsional forces through your spine so should only be performed once you have completed the other steps. There are many advanced exercises you can do with equipment (enquire about them with your osteopath). The following are simple home exercises.
EXERCISE 1: Sit Ups
1. Lie on your back with your arms across your chest and your knees bent and the balls of your feet placed on the ground.
2. Tighten your abdominal (TA & Pelvic Floor) and then buttock muscles (Gluteal Muscles).
3. Slowly lift your neck and head followed by your upper back/shoulders up to the line of your knees.
4. You may lose some core activation during the lift so activate your core again (try to pull your belly button back toward your spine).
5. Remember to breathe through the exercise.
6. Pause for 3 seconds and slowly drop back down again to the start position.
7. Commence with 10 repetitions 3 times per day and progress to 30 repetitions.
Note: This exercise can be enhanced/progressed by holding a weight to your chest

EXERCISE 2: Oblique Sit Ups
1. Lie on your back with your arms across your chest and your knees bent and the balls of your feet placed on the ground.
2. Tighten your abdominal (TA & Pelvic Floor) and then buttock muscles (Gluteal Muscles).
3. Slowly lift your neck and head followed by your upper back/shoulders up and twist so that your elbow meets your opposite knee.
4. You may lose some core activation during the lift so activate your core again (try to pull your belly button back toward your spine).
5. Remember to breathe through the exercise.
6. Pause for 3 seconds and slowly twist back down again to the start position.
7. Repeat with opposite elbow.
8. Commence with 10 repetitions 3 times per day and progress to 30 repetitions.
Note: This exercise can be enhanced/progressed by holding a weight to your chest
Colgan Osteopath in Kettering Northamptonshire
Colgan Osteopath in Hatfield, Hertfordshire
To book an appointment, call 07738493974 or book online